Power Supplies: Difference between revisions
Jump to navigation
Jump to search
FrankRahman (talk | contribs) (→Astec) |
FrankRahman (talk | contribs) (→Astec) |
||
| Line 18: | Line 18: | ||
|- | |- | ||
| [[File:Astec1.jpg|thumb]] || [[File:Astec1 rifas.jpg|thumb]] || Label || Text | | [[File:Astec1.jpg|thumb]] || [[File:Astec1 rifas.jpg|thumb]] || Label || Text | ||
|- | |||
| [[File:Astec2.jpg|thumb]] || [[File:Astec2 rifa.jpg|thumb]] || [[File:Astec2 Label.jpg|thumb]] || Note the change in position for the one cap of the 4 on the right side. | | [[File:Astec2.jpg|thumb]] || [[File:Astec2 rifa.jpg|thumb]] || [[File:Astec2 Label.jpg|thumb]] || Note the change in position for the one cap of the 4 on the right side. | ||
|} | |} | ||
Revision as of 18:06, 29 January 2024
Boschert
 |
 |
Label | Text |
 |
 |
 |
Text |
From the Tech Manual for switching to 220V:
Identified by the word "Boschert" on the component side of the board at lower right and above the fuse and capacitor C2.
Locate a six-inch wire that is soldered to point JP1. If the board is configured for 110V, the other end of the wire is attached to point E1 (labelled 110V).
Unplug the wire from point E1 and plug it into E2 (labelled 220V). Point E2 is to the left of point E1. The power supply is now configured for 220V use.
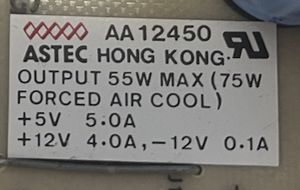
Astec
 |
 |
Label | Text |
 |
 |
 |
Note the change in position for the one cap of the 4 on the right side. |
From the Tech Manual for switching to 220V:
Cal DC
 |
No RIFAs | Label | Text |
From the Tech Manual for switching to 220V: